|
I've always loved the BMW X5 Tiger Claw alloy wheels, and it's quite a common upgrade on the Renault Trafic (along with the Vivaro and Primaster), as they are very easy to fit and look great! I purchased some from eBay a couple months ago and they were in great condition. I then took them to my local body shop to take off the BMW badge centre caps and just give them a general tidy up. I prefer having blank centre caps, as I think having BMW badges on a Renault is a bit strange! The Fitting KitThe PCD on my Trafic is 5 x 118, and the BMW alloys are 5 x 120. This meant I had to buy some variation bolts to make them fit properly (these are also known as 'Wobbly' bolts). I also had to get some spigot rings so that the wheels sat on the hub correctly and prevent them from wobbling about. There are loads of 'Fitting Kits' online that give you everything you need to get these wheels to fit perfectly, and I bought these ones from eBay. They came with 16 variation bolts, 4 locking bolts and 4 spigot rings.  The Obligatory Problem!As with everything I attempt to do, something went wrong! Because the alloys were previously on a BMW X5, they came with massive tyres on them! The tyres were 255/50/19 Michelin's, and when it came to fitting them they wouldn't even fit on the hub because they were far too wide. The rear wheels are also wider than the front, the fronts being 9J and the rear being 10J. I trawled the internet to find out what other people had put on them to make them fit properly, and then I went along to my local tyre place and asked them too (just to be safe!). In conclusion, the best tyre size for the job were 245/40/19.
3 Comments
Wow... Well over a year since my last post! I'm actually ashamed of myself for leaving this blog, and my van project, for so long. This past year and a half or so has been a real rollercoaster ride for me, lots of ups and lots of downs, but finally things are on the up again and I couldn't be more excited for the adventures that lie ahead with my van project! So, where to begin?! There's so much I need to tell you all to get you back up to date with everything! I'll only be skimming through a lot of things in this post, but in future posts I will go into a lot more detail about each subject, along with loads of juicy pictures to accompany them! Rock 'n' Roll BedI've had the Rock 'N' Roll bed in for well over a year now. I bought it from Cannon's Forge based in Worksop, Nottinghamshire, which isn't far from where I live. I can't remember the exact price I paid at the time, but their website does list the current prices and all the option extras you can order along with it. My bed came with 2 x 3 point seat belts, meaning I can have 2 extra passengers in the back. This comes in really handy even if there are only a couple of passengers, as cramming 2 'larger' people onto the front bench seat can be a rather tight fit. I had my bed upholstered by Cannon's Forge too. I chose to have a black patterned hard wearing fabric (which I believe to be a Mercedes fabric but I may be wrong) and black leatherette. I'm really happy with the look and feel of the bed, and it does feel extremely well put together and solid. I also opted for the memory foam and I couldn't recommend it enough! It's unbelievably comfortable, much better than the bed I have at home, and well worth the money. All their beds come with free fitting. Mine is bolted to the underside of the van, and can easily be removed and refitted in about 2 minutes with 4 bolts. Fitting The CupboardsNow on to the most daunting and difficult tasks, fitting the cupboards! I bought a set of premade plain MDF cupboards from Majestic Camper Supplies on eBay for £249.99. Delivery was extremely quick and even though they came without instructions, it wasn't too difficult to work out how to put them together! The exact cupboards I bought can be found here, and below is a picture of it from their eBay listing.  All I had to do was build the cupboards and fit them against the van's ply wall, which is a lot easier said than done! I test built them soon after they arrived, and without the bed fitted to give me more room to play about. They were extremely simple to build and fit together really well. I then took them down, put them in my garage, refit the bed and forgot about them for about 6 months. That was until one of my best friends and his brother (who is a joiner by trade) offered to help me permanently fit them last week, and below is how they turned out.  So, I've been quite slow at finishing the campervan conversion (lazy) and I haven't updated the blog for quite a long time too (also lazy), but I'm back on it now and it's come along quite a way from the last post! Not all of the pictures in this post were taken in the order they are on this page, so it might look like I'm skipping things but I will try and cover everything I can. Finishing The InsulationI've finally finished the insulation (except on the ceiling but it's almost there). It's a very simple task that I dragged out for far too long, using the insulation foil and recycled plastic loft insulation wool. And then it came to doing the floor... All I put across the floor was a layer of foil before putting in the new ply. The original ply was 9mm, so I decided to replace it with 12mm to add strength. I was told using 9mm ply could make it crack or warp under the weight of the bed and other furniture/ people. It isn't perfectly cut because I didn't really have a good tool for the job, but to be honest I'm surprised how well it turned out. Then I put another layer of foil (just taped to the wall this time using the foil tape) over the loft insulation. I did this to create a vapour barrier. I then just screwed the original wall ply on top of it ready for carpeting! There's also a sneak peak of the bed in the above photo ;-). For some strange reason I don't even have a proper photo of the bed, so I'll take some before my next post to show it off properly. Onto The Carpet and Vinyl Floor!Next up was carpeting the walls and laying the vinyl floor. I had some help off a friend with the floor and most of the carpeting, as its quite difficult and I'm pretty useless!
The vinyl was from my friends carpet and floor shop so I don't have a link to it, but the carpet was Contour Automotive's from Ebay. I bought 15 square meters, all in the 'Smoke' colour. This is just a quick update to show some of the progress I've made on my Renault Trafic campervan project since the last post. First of all, I have fitted the Parrot MKi9200, which should of been a simple plug and play, but obviously it was a bit more of a nuisance than that!  As you can see there is an insane amount of wires, and they only just fit behind the stereo inside the dash. My van stereo had a permanent live wire to the battery, but I also needed an ignition live (to prevent it constantly using the batteries power and killing it over time) but my van didn't have one. So the only solution was to connect the wire to an ignition live source. So my work mate who is pretty clued up on electrics came over with a few tools and we soldered the ignition wire to fag lighter socket. It was a bit of a pain though, as the dash was a nightmare to move things through it. Typical! Back onto the insulation, I haven't done as much as I'd of liked, but its coming along quite nicely! The weather has been terrible and it's horrible having the doors or windows open in it, but I cant keep them closed because the glue has quite an unpleasant smell! I'm using Wickes Thermal Insulation Foil, which is usually £11.99 for an 8000x600mm roll, but I got it for £9.99.  It doesn't look pretty but you aren't going to able to see it once the ply is back on and its all covered up. I'm using carpet adhesive to glue the foil insulation on, and it works a treat! Also using foil tape (80p a roll from Mega Value, so I have tons of it!) to seal the foil overlays and also covered all the holes the carpet will go over. The reason I did this was because I've been told that if you carpet straight over the holes, stains seep through from the other side and dirty the carpet.  It got dark before I managed to take more photos so I'll get some more tomorrow, but I have also started stuffing the big gaps between the body and the interior skin. Just going nuts with it, making sure every possible part is reached.
I'm using Diall Loft Insulation from B&Q. It's made from recycled plastic, and it's quite nice to handle, no itching or discomfort and easy to tear apart. I read that this stuff is better than other types of insulation such as sheep's wool because it doesn't hold moisture as much so it doesn't rot the metal or smell when wet. I've done a bit of the roof with the loft insulation, just to see how easy it is to use, but the walls and floor are my priority at the moment because... I know I haven't posted for a while, progress has been slow but I've finally got around to working on the van properly but it's full steam ahead from here! So now the Civic has been sold and I have the van at home, it's time to clean it up and get the base down ready for the campervan conversion! But first a little bit about the snow we got a little while back now... In the early hours of the morning (21/11/15) I got to test the van in the snow, nothing I ever got the chance to do in the civic. It coped really well to my surprise and was quite easy to handle. I took a few random photos for the blog. It wasn't much snow but was enough to make conditions difficult. Now on to the original blog topic, preparing the van! I started off by stripping out the ply and removing the bulk head. The bulk head was fairly easy to remove, until I got to 2 strange screws. I'm not sure what they are exactly, but they were just plain black screws with a little dimple in the middle. I couldn't press it in to remove it, so I did the next best thing and smash it off with a flat head screwdriver and hammer! Always does the trick...
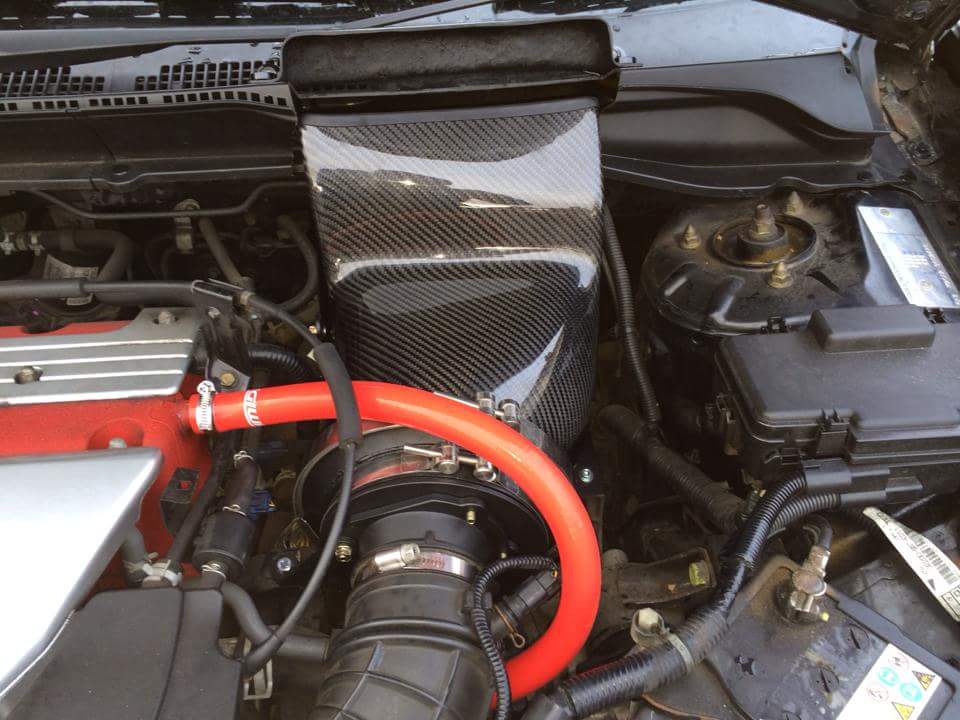
The screwdriver and hammer trick also came in handy when removing the ply. The walls and wheel arch boards were very easy as the screws were pretty much fully intact, but the floor was a different matter. Some of them were pretty impossible to see, never mind remove! But with a bit of patients, and mainly brute force, they were all off. Welcome to the third and final part of my Civic Type R story, a fitting tribute to a truly amazing car! The next thing I wanted was a big loud exhaust, so I decided to go for the M2 stainless steel with the right and upwards Japanese "kick" style. I also bought a unsilenced centre pipe too, I believe it was Supersprint but can't remember exactly. It looked the business and sounded amazing! (I'l try to get a video up on Instagram later on). After having the boring K&N cone filter on for quite a while I decided to change the air intake to the Tegiwa carbon airbox. It should of cost £350 but I got it in a sale for around £280. It is a blatant copy of the Gruppe M, which are priced around £650-£780 new! Even the second hand ones were usually more expensive than a new Tegiwa copy. Tegiwa's customer service and deliveries are pretty woeful I found though. The parts came with no instructions and it took me about 3 weeks and numerous complains to get them sent via email. Then when I later ordered the silicone intake pipe off them (which cost me £50) they sent me the small silicone breather pipe instead (which cost £18), and it took me ages and loads of hassle to get it changed!
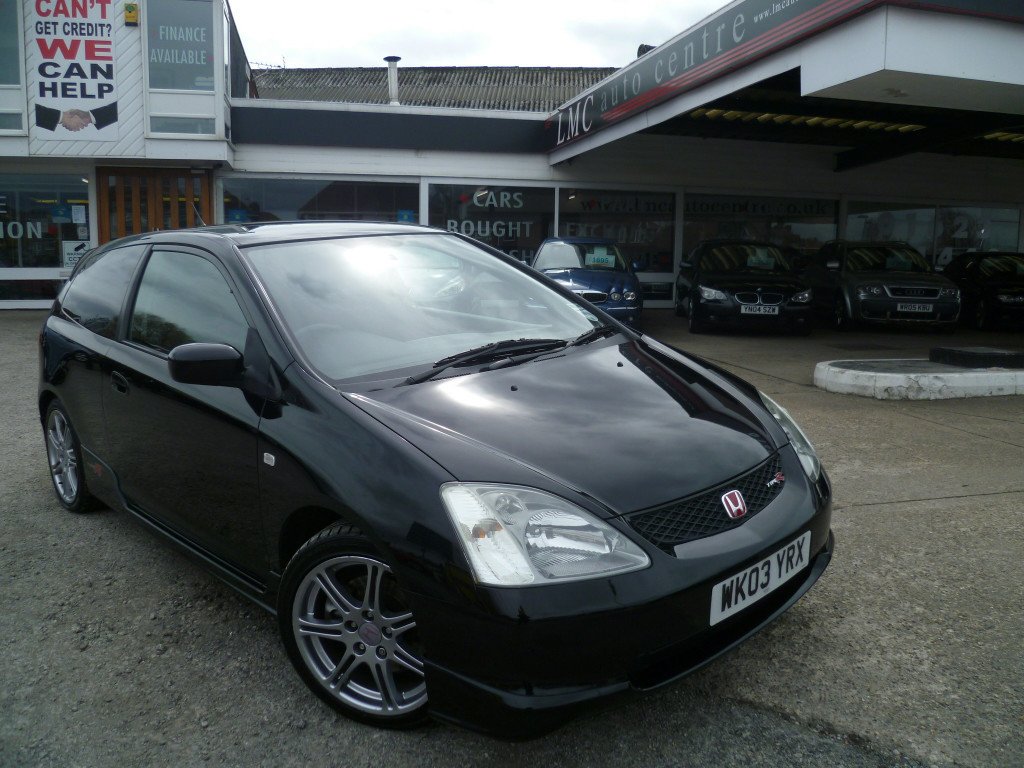
Welcome to part 2 of my goodbye post to my Honda Civic Type R. This post is going to be quite picture heavy. While I was away on a family holiday to Disney World in Florida, I booked my car in to a friends bodyshop to have quite a lot of work done on it. Click here to view their Facebook page and see all of their amazing work. They do a lot of work on expensive high performance cars and are second to none, and I had total faith in them to give me the best finish possible, and they didn't disappoint! First of all I had a Mugen (replica) splitter fitted to the bumper, which made the car look a lot more aggressive. It was a cheap(ish) fibreglass splitter bought off Ebay, and required a bit of modification to make it fit to the original bumper properly. It was then painted and put onto the car. Then came the bodywork cleanup and respray. The bumper and front wings had quite a few stone chips and the doors had the usual (annoying!) dints that more than likely came about in supermarket car parks. Now I've finally managed to buy myself a van, it's time to say goodbye to my Honda Civic Type R. I'm really sad to see it go, but I simply cannot afford to run this along side my van and Peugeot 205 GTi :(. It's been an absolutely brilliant car, never missed a beat and extremely fun to drive. It's definitely going to be missed... After landing a job driving buses when I turned 19, I managed to save up enough money to afford the car (and insurance) I wanted for a very long time, a Honda Civic Type R EP3. I managed to find one at a local car dealership, literally a mile up the road from me, and purchased it for about £3200 with about 90k miles on it. The insurance was a sting though, the lowest quote I managed to get was around £1600 from Admiral, but that didn't stop me buying it as I just loved the car so much. Honda Civic Type R EP3 Facts & Figure
The Civic was in decent condition but as soon as I got it home I began work on cleaning it up, inside and out.
This is just going to be a quick post to introduce the new gaming section to this blog and the YouTube channel to go along with it. I plan to post regular gameplay videos from various games on my PC and PS4, and will probably do some commentaries along with some, but I bet they turn out bad! You can easily access the YouTube channel from the link at the top of the page or by clicking here. Its currently a work in progress but you will see quite a lot of changes over the coming weeks. Please subscribe :D My first video released on this channel is a gameplay video of the classic game (and one of my all time favourites) Rollercoaster Tycoon 1. It features the first and easiest level - Forest Frontiers, from an empty plot of land to an exciting Theme Park. The video can be found below. I also have a Twitch account which can be found @ http://www.twitch.tv/agamerslifeforme/profile
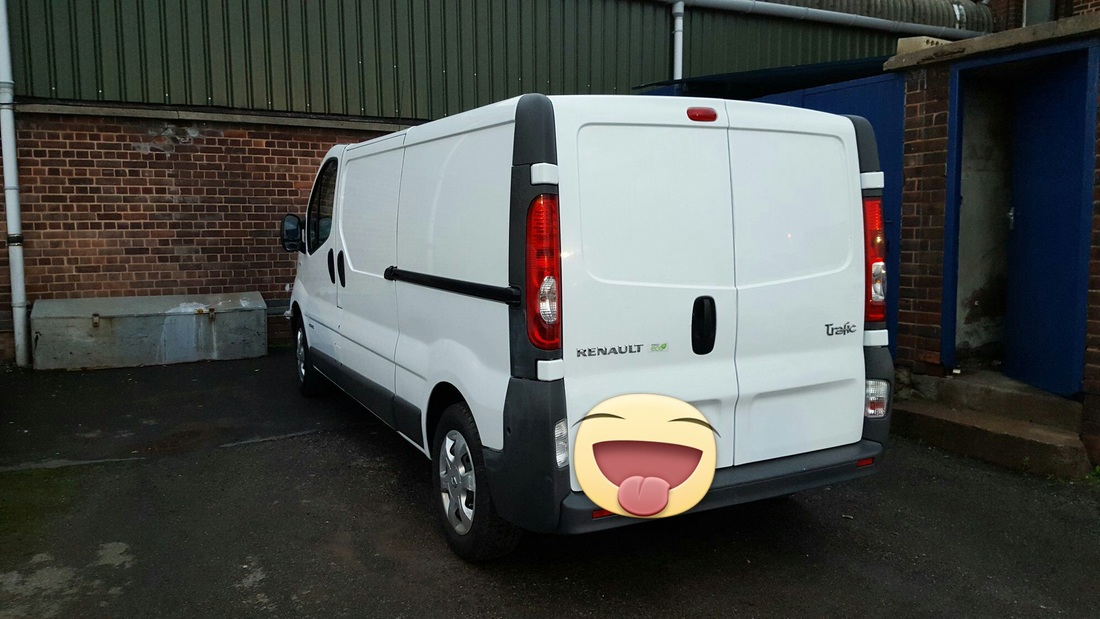
I will more than likely be streaming every once in a while depending on the amount of time I get, but I will keep you all updated. So, the main reason I set this blog up was to document my Campervan project and adventure. The only problem was...I didn't have a van. The plan was to set up this blog, get a few basic posts down and get it looking how I wanted, and then post regular updates. But buying a van took a lot longer than I thought it would. I'd been looking at Volkswagen Transporters, as they are really common to transform into a Campervan and have a massive following. But I wanted to try something a bit different and I couldn't justify the prices the standard vans were valued at. But the wait is now over!! (Kinda) I have bought myself a very clean and looked after (which is quite rare for a van) 2012 Renault Trafic. It is the LL29 2 Litre dCi, 115ps model. It's long-wheel base (LWB) so will work perfect for what I want it for.
|
AuthorHey guys I'm Billy, a lorry driver from the UK. Join me throughout my various travels and projects. Archives
August 2017
Categories |


 RSS Feed
